Are you wondering what shin conditioning is or how to condition the shins correctly?
In this article, we’ll examine and answer:
- What is shin conditioning?
- How does shin conditioning work? (the science)
- How to condition shins for Muay Thai & MMA
- Shin conditioning recovery
- Shin conditioning schedule
- Shin conditioning: What to avoid (the myths)
- Is shin conditioning permanent?
- Shin conditioning side effects
Let’s get into it.
Contents
- What Is Shin Conditioning?
- How Does Shin Conditioning Work? (The Science)
- How to Condition Shins for Muay Thai & MMA (Step-By-Step Guide)
- Shin Conditioning Recovery (Best Ways)
- Shin Conditioning Schedule
- Shin Conditioning: What to Avoid (The Myths)
- Is Shin Conditioning Permanent?
- Shin Conditioning Side Effects: Are There Any?
- The Bottom Line
What Is Shin Conditioning?
Shin conditioning is strengthening and toughening the shin bones and surrounding tissues through systematic and controlled exposure to impact and stress.
This makes the shins more resilient to pain and injury during strikes and blocks and allows fighters to continue kicking and blocking for the entirety of a fight. It also makes them more willing and faster to kick.
Shin conditioning is a common practice in Muay Thai and MMA because fighters know how effective leg strikes and leg checks are.
Ultimately, conditioned shins help fighters secure the win and an increased paycheque.
How Does Shin Conditioning Work? (The Science)
Shin conditioning is achieved through a combination of exercises, techniques, and biological adaptations, turning the shin into a deadly weapon for striking and blocking.
To know how to condition the shins, it’s first important to know how shin conditioning works.
There are 7 main components to how shin conditioning works:
1. Wolff’s Law
Wolff’s Law explains how bones remodel and adapt in response to the stresses placed upon them. Regular and controlled impact on the shins encourages the bone to increase in density and strength.
2. Microfractures
Each time the shin experiences impact, it may sustain tiny fractures known as microfractures.
Microfractures are a natural part of the shin conditioning process as the body repairs these fractures and strengthens the bone against future impacts.
3. Inflammatory Response
Immediately after the impact and the occurrence of microfractures, the body’s natural healing mechanisms spring into action.
The inflammatory response brings essential nutrients and immune cells to the microfractures. This aids in recovery and sets the stage for long-term adaptation.
4. Ossification
With continued and consistent trauma, the body starts a more long-term adaptation process known as ossification.
Ossification sees softer tissues, especially cartilage, gradually transform into bone. Ossification further hardens the shin surface and makes it stronger and more resistant to injury.
5. Collagen Remodeling
Alongside ossification, the skin and underlying tissues of the shin undergo changes.
There are a lot of collagen fibers in these tissues, which break down with repeated impact and then rebuild in a denser, more cross-linked arrangement.
This results in rigid and more resilient skin and tissues able to withstand greater forces.
6. Muscle Hypertrophy
The muscles surrounding the shin, notably the tibialis anterior, grow stronger and more developed.
This muscular shield provides an added layer of protection, cushioning the shin bone during impacts and aiding in delivering more powerful strikes.
7. Pain Tolerance
Repeated exposure to impact during shin conditioning trains both the body and mind to become more resilient to pain.
This adaptation is largely due to the nervous system reducing the pain signal, as it no longer perceives the repeated trauma as a significant threat.
Several factors contribute to this:
- Habituation: The body becomes accustomed to the repeated trauma, leading to a reduced pain response.
- Gate Control Theory: Repetitive stimulation can limit pain signals from reaching the brain.
- Endorphin Release: Physical stress triggers the release of the body’s natural painkillers.
- CNS Adaptation: The central nervous system adjusts, decreasing the intensity of pain signals sent to the brain.
- Psychological Resilience: Fighters mentally train to withstand and manage discomfort.
As a result, practitioners develop a heightened pain threshold over time, enabling more effective training and fighting.
While conditioned shins still experience pain and swelling post-fight, the enhanced pain tolerance ensures fighters remain active with their kicks and defensive checks throughout a bout.
How to Condition Shins for Muay Thai & MMA (Step-By-Step Guide)
In short, conditioning the shins is done over time by kicking heavy bags and pads 3 or 4 times per week, weightlifting to build the muscles around the shins (hypertrophy) twice per week, and making sure to fully recover before the next shin conditioning session.
Here’s how to condition shins for Muay Thai and MMA step-by-step:
1. Beginner: Building a Foundation
Cardio
Those who regularly perform cardio naturally have stronger shins than those who don’t. It doesn’t matter if it’s a sport such as football (soccer), tennis, or basketball – you just need to move on your feet.
However, running and rope skipping are the two best cardiovascular exercises for martial artists who want to condition their shins.
Running or jumping rope 2-3 times per week propels the shin conditioning process as it helps strengthen the bones and muscles of the feet and shins, and also introduces them to minor impacts.
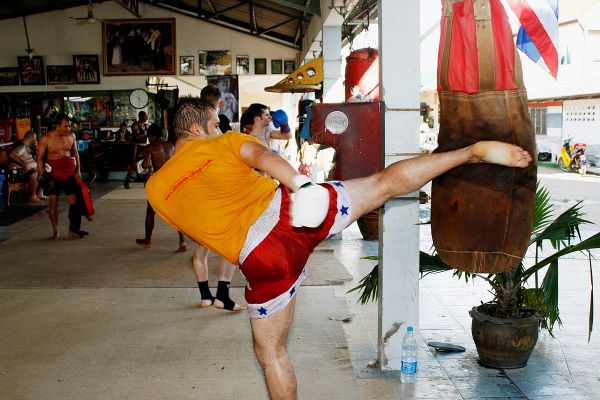
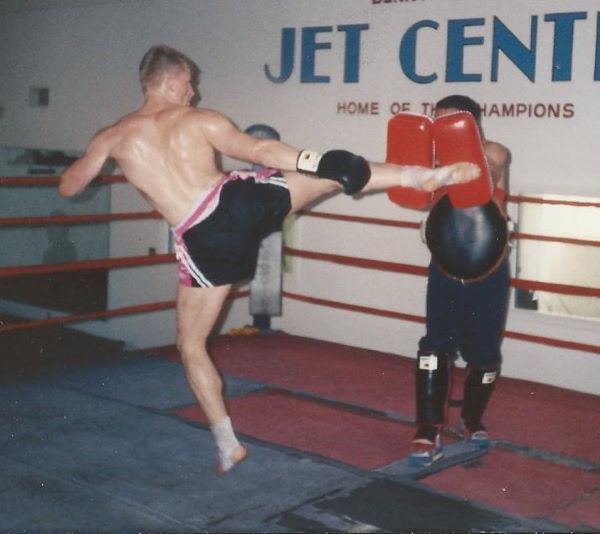
Kicking the Heavy Bag
Kicking the heavy bag is the most essential exercise when it comes to shin conditioning.
Begin by gently kicking a heavy bag, focusing on technique rather than power. This introduces your shins to impact and lets you get a feel for the impact your shins can currently take.
Also, using proper technique ensures the impact is distributed evenly across your shin to reduce the risk of injury and maximize the benefits of the conditioning process.
Aim for at least 50 kicks on each leg or as many as you can manage. You should experience mild soreness or a burning sensation in your shins, but stop kicking if you experience sharp pains as it can lead to injuries.
Make sure your shins are fully recovered from any pain before your next heavy bag session.
Weightlifting
Start performing weighted leg exercises two days per week, specifically squats, lunges, anterior tibialis raises, and calf raises. Try to add weight every session (progressive overload).
On the first leg day, train in the rep range of 8-10. On the second leg day, train in the rep range of 4-6. All reps should be controlled and performed with the correct form.
If you’re struggling to go up in weight, add more repetitions until you can.
This is an ideal balance of hypertrophy and strength training and will build the muscles around the shin. It’ll also add power to your kicks.
Cold Compress
After each training session, apply a cold compress (ice pack) to your shins. This reduces inflammation and aids recovery.
2. Intermediate: Intensifying the Process
Progressive Bag Work
Gradually increase the power and frequency of your kicks on the heavy bag. This will further condition your shins and prepare them for more intense training methods.
There isn’t a specific number but you should work toward being able to do 100 powerful kicks with each leg, in each session. Remember to maintain proper technique while adding power.
Rolling
Use a wooden eskrima stick to roll over your shins. Ensure the tool is smooth and free of splinters to avoid unnecessary injury.
Starting at the top of the shin, apply moderate pressure and slowly roll the stick down the length of your shin to your ankle.
The pressure should be firm but not overly painful. The goal is to stimulate the shin without causing harm.
Spend about 10 minutes on each shin. You can break this into 5 minutes of rolling followed by a 1-minute rest and repeating.
This method helps break down the collagen fibers in the skin and underlying tissues of the shin.
The fibers then rebuild into tougher, more resilient skin and tissue (collagen remodeling).
Recovery
After intense heavy bag sessions where you’re kicking with a lot of power, make sure to stretch for 5 to 10 minutes to aid in recovery and flexibility.
You should also use a cold compress to reduce inflammation and aid recovery.
Ensure you have rest days in between intense sessions to ensure full recovery and adaptation. This might be 1, 2, 3, or more depending on how your shins feel.
3. Advanced: Perfecting the Art
Shin-to-Shin Conditioning
With a trusted partner, tap your shins together, starting lightly and increasing force over time. This method should be approached with caution and under the guidance of someone experienced.
Done correctly, shin-to-shin conditioning is more mental than physical. It’s about removing the fear of being hurt when kicking an opponent, whether it be kicking their shin, elbows, knees, or any other hard area.
With this fear removed, fighters are free to blast their way to victory with powerful roundhouse kicks to the legs, body, and head.
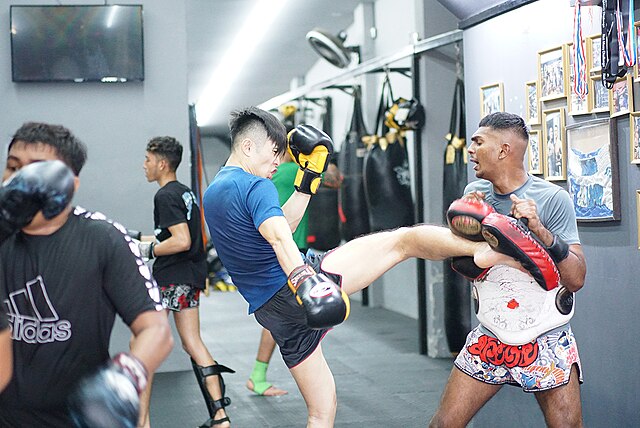
Thai Pads & Muay Thai Banana Bags
These are denser and offer more resistance than regular heavy bags used in the intermediate stage.
Kicking these regularly will significantly toughen up your shins, especially kicking the lower third of the Muay Thai banana bags. This is the hardest part as the weight of the bag sinks into the bottom.
While the Thai pads aren’t as hard as the Muay Thai banana bags, they’re smaller targets which means you practice your kicking accuracy while conditioning your shins.
On either the Thai pads or banana bags, aim for 150 to 200 kicks per leg in each session, or as many as required. For optimal results, train with the Muay Thai Banana Bag at least 3 times a week.

- Curved shape: Fairtex Thai pads are specifically designed for maximum…
- Safe and easy to use: Made with premium cow hide leather, the boxing…
- Comfort first: Fairtex kick mitts are made with two support straps for…
Shin Taps
Some advanced practitioners use shin conditioning sticks to tap their shins, further increasing bone density and their pain threshold.
UFC fighter Stephen ‘Wonderboy’ Thompson likes to hit both the blade and the inside of the shin (the flat part) from top to bottom for roughly 15-20 minutes (10 minutes each). He starts soft and gradually hits harder.
There shouldn’t be unbearable pain but it should be uncomfortable. Over time, as the shins become conditioned, the force of the taps can be increased.
Sparring and Fighting
Sparring contributes to shin conditioning even when shin guards are worn. Shin guards allow fighters to practice their kicks with full force, refining technique, timing, and accuracy in a controlled fight setting.
While the guards absorb much of the impact, the shins still experience controlled impact, gradually building pain tolerance and familiarizing them with the sensation of impact.
This consistent exposure, combined with the safety benefits of reduced injury risk, ensures sparring sessions effectively prepare the shins for the more intense impacts experienced in actual fights.
However, fighting is the ultimate test and improver of shin conditioning. When fighting, fighters deliver and receive kicks without the cushioning of shin guards.
This direct bone-to-bone contact pushes the shins to adapt, further increasing their resilience and toughness.
The repeated impacts during fights stimulate the processes of bone remodeling, collagen restructuring, and pain tolerance adaptation.
Moreover, the psychological aspect of enduring pain in a live match setting reinforces a fighter’s mental fortitude, ensuring they remain aggressive and confident in their kicks and blocks, even when faced with bare shin clashes.
Here’s how UFC fighter, Stephen ‘Wonderboy’ Thompson, conditions his shins:
Also especially important to shin conditioning is the recovery process.
Let’s take a closer look.
Shin Conditioning Recovery (Best Ways)
Recovery is a vital component of shin conditioning. Here’s a comprehensive list of the best ways to recover shins post-shin conditioning workout:
Massage
Regular massages improve blood flow to the affected area. This increased circulation helps in the healing of micro-fractures and tissue damage.
Using oils like arnica or comfrey can further aid in reducing inflammation and promoting healing.
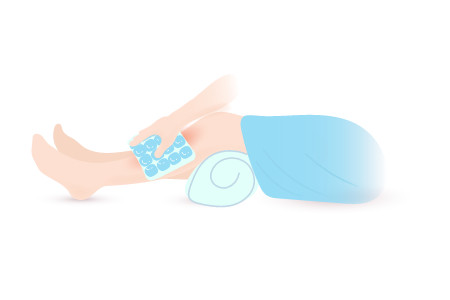
Cold Compress
Applying a cold compress or ice pack immediately after a workout can help reduce inflammation and numb the area, providing relief from pain. Always wrap the ice or cold pack in a cloth to prevent frostbite.
Elevation
Elevating the legs helps reduce swelling by allowing fluids that might accumulate in the shins to drain away. This can be especially beneficial if there’s noticeable swelling after a fight.
Anti-inflammatory Medication
Over-the-counter non-steroidal anti-inflammatory drugs (NSAIDs) like ibuprofen and naproxen can help reduce pain and inflammation after a shin conditioning session.
Anti-inflammatory creams and gels also work, such as Arnica, Diclofenac Gel (e.g. Voltaren), and menthol-based Creams (e.g. Biofreeze).

- DOUBLE ACTION WITH FAST ABSORBING, NON-GREASY & UNSCENTED…
- SOOTHING CREAM: The Arnica Montana plant is a natural pain…
- HIGH QUALITY INGREDIENTS: Real Relief Arnica Cream has No…
Hydration
Drinking plenty of water aids in muscle recovery and helps flush out toxins from the body. Staying hydrated also ensures nutrients essential for repair and recovery are transported efficiently to the cells.
Make sure to drink at least 4 liters of water per day to optimize shin conditioning recovery.
Proper Nutrition & Supplementation
Eating a diet high in the following nutrition helps in shin conditioning recovery.
1. Bone Building Nutrients
- Protein: Essential for repairing the collagen matrix in bones, giving them flexibility and resilience. Protein-rich foods like lean meats, poultry, fish, beans, lentils, tofu, and dairy products can support bone repair after shin conditioning.
- Calcium: A primary component of bones. Dairy products, fortified plant-based milk, leafy greens, and fish with bones are good sources.
- Vitamin D: Enhances calcium absorption. Natural sunlight, fatty fish, fortified foods, and supplements are sources.
- Phosphorus: Works with calcium for bone structure. Found in dairy, meat, and beans.
- Magnesium: Important for bone strength. Sources include nuts, seeds, whole grains, and leafy greens.
- Vitamin K2: Directs calcium to the bones. Found in fermented foods, cheese, and meat.

- An essential Vitamin: Vitamin D is an essential nutrient for healthy…
- Sunshine In a Bottle: The Vitamin D Council recommends daily vitamin D…
- Pure & natural: These Vitamin D3 immune support and bone health…
2. Anti-inflammatory Nutrients:
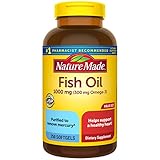
- Omega-3 Fatty Acids: Reduce inflammation. Found in fatty fish, flaxseeds, and fish oil supplements.
- Turmeric & Curcumin: Known for anti-inflammatory effects.
- Heart health support supplement: contains one 250 count bottle of…
- Nature Made Omega 3 Fish Oil 1000 mg softgels are purified to remove…
- One serving of two fish oil softgels provides 600 mg Omega-3 fatty…
- EXTRA STRENGTH TURMERIC: Our premium T3 Turmeric Curcumin Complex…
- EFFECTIVE JOINT SUPPORT: Turmeric is arguably the most powerful herbs…
- WITH BIOPERINE FOR MAX ABSORPTION: BioPerine, a patented black pepper…
3. Supplements for Bone Health
- Bone Broth: Supports bone repair with its rich mineral and collagen content.
- Collagen Supplements: Beneficial for bone strength and the surrounding joint and skin health.
- Glucosamine & Chondroitin: Support the cartilage around the bone.
- EXTRA STRENGTH TURMERIC: Our premium T3 Turmeric Curcumin Complex…
- EFFECTIVE JOINT SUPPORT: Turmeric is arguably the most powerful herbs…
- WITH BIOPERINE FOR MAX ABSORPTION: BioPerine, a patented black pepper…
Compression Sleeves
By exerting consistent pressure on the shins, compression sleeves promote enhanced blood flow and ensure oxygen-rich blood reaches damaged tissues for faster healing.
This pressure also effectively reduces swelling, which can cause discomfort and prolong recovery.
Lastly, they retain heat and offer warmth and comfort to sore shins, giving athletes a psychological boost of security.
Rest
Perhaps the most crucial aspect of recovery is rest. Giving your shins adequate time to heal and recover between shin conditioning sessions ensures they’re ready for the next round.
The amount of rest and rest days needed is different for everyone, but most practitioners can fully recover with 1 or 2 days of rest. Make sure to let the shins fully heal before any further shin conditioning.
Equally important is adequate sleep, where most of the healing process takes place. Aim for 8 hours of sleep per night.
Stretching
It’s also important to stretch the muscles surrounding the shin, such as the tibialis anterior, to alleviate any built-up tightness or tension.
This reduces the risk of muscle strains and enhances flexibility, ensuring the muscles can better handle future training sessions.
Moreover, stretching promotes increased blood circulation to the affected areas, accelerating the healing of microfractures and reducing inflammation.
Some of the best stretches to do are the calf, shin, quad, hamstring, and Achilles tendon stretch.
Incorporating a consistent stretching routine after shin conditioning can significantly quicken recovery and prepare the shins for subsequent training.
Active Recovery
On days following intense shin conditioning, consider light activities like walking or cycling. Active recovery can stimulate blood flow to the muscles without putting additional strain on them.
Overall
Remember, everyone’s body is different, and what works best for one person might not work as well for another.
An essential skill in the shin conditioning journey is the ability to listen to the body and know when to rest and recover. It’s also about finding a recovery routine that suits your individual needs best.
Shin Conditioning Schedule
Combining the shin conditioning guide and the shin conditioning recovery methods, here’s how a shin conditioning schedule may look:
Monday: Foundation Building
- Running: 20 minutes with sprints mixed in.
- Jumping Rope: 15 minutes, focusing on light jumps.
- Light Bag Work: 3 sets of 20 kicks per leg. Focus on technique.
- Rest & Recovery: Apply a cold compress for 15 minutes post-training.
Tuesday: Intensity Day
- Progressive Bag Work: 4 sets of 25 kicks per leg. Increase power with each set.
- Rolling: Roll a hard wooden stick over each shin for 10 minutes, targeting both the blade and the inside of the shin.
- Sparring: 15 minutes of controlled sparring with a partner, using shin guards.
- Rest & Recovery: Apply a cold compress for 15 minutes post-training and stretch for 10 minutes.
Wednesday: Rest Day/Weighlifting
- Weightlifting: 45 minutes to 1 hour performing 3 or 4 sets of 8 to 10 reps for squats, lunges, anterior tibialis raises, and calf raises.
- Massage: Spend 10-15 minutes massaging each shin to improve blood flow.
- Stretching: 20 minutes of full-body stretching, focusing on the legs.
Thursday: Technique & Power
- Thai Pads & Banana Bags: 5 sets of 20 kicks per leg.
- Shin-to-Shin Conditioning: 3 sets of 10 taps per leg with a trusted partner. Start lightly and keep it controlled.
- Rest & Recovery: Apply a cold compress for 15 minutes post-training, and stretch for 10 minutes.
Friday: Endurance Day
- Running: 25 minutes
- Rope Skipping: 20 minutes, incorporating high-intensity intervals.
- Sparring: 20 minutes, focusing on technique and defense (using shin guards).
- Rest & Recovery: Apply a cold compress for 15 minutes post-training and stretch for 10 minutes.
Saturday: Active Recovery/Weightlifting
- Weightlifting: 45 minutes to 1 hour performing 3 or 4 sets of 4 to 6 reps for squats, lunges, anterior tibialis raises, and calf raises.
- Light Bag Work: 3 sets of 15 kicks per leg. Focus on technique, not power.
- Stretching: 25 minutes of full-body stretching, emphasizing the legs.
- Massage: Spend 10-15 minutes massaging each shin.
Sunday: Complete Rest Day
- Rest & Relaxation: Allow your body to recover fully.
- Diet & Supplements: Ensure you consume foods rich in calcium and vitamin D. Consider taking supplements that support joint and bone health.
Progress & Results:
Shin conditioning is a gradual process. While the initial stages might involve some discomfort and bruising, with consistent training, the shins will start to become more resilient.
Most people begin noticing a difference in their pain threshold and shin toughness after 4-6 weeks.
However, significant bone and tissue adaptations can take several months to over a year, depending on individual factors and consistency in training.
No matter how conditioned the shins become, a shin conditioning schedule/routine is essential for maintaining them.
Always remember to listen to your body. If you experience excessive pain or believe you might have a more severe injury, take additional rest days and consult with a medical professional.
Shin Conditioning: What to Avoid (The Myths)

Here are some of the most commonly associated myths of shin conditioning.
Kicking Trees
- Myth: Many believe repeatedly kicking hard surfaces like banana and bamboo trees will rapidly condition and toughen the shins.
- Reality: While trees have been used traditionally in some Muay Thai training regimens, it’s mostly just for show and not how they conditioned their shins.
Consistently kicking hard surfaces without proper progression can lead to severe injuries, including deep bone bruises or fractures. It’s essential to start with softer targets and gradually progress to harder ones.
Using Glass Bottles
- Myth: Rolling glass bottles on the shins will toughen them.
- Reality: Glass bottles can cause cuts and are not an effective or safe method for shin conditioning. There are safer tools and methods like foam rollers or wooden eskrima sticks.
Metal Tubes or Poles
- Myth: Hitting the shins with metal objects will make them invincible.
- Reality: Striking the shins with hard metal objects can cause significant damage, leading to potential fractures or deep bone bruises. It’s a dangerous practice and not recommended.
No Pain, No Gain
- Myth: The more pain you endure during shin conditioning, the faster and better the results.
- Reality: While some discomfort is expected during shin conditioning, excessive pain is a sign that the body is being pushed too hard and can lead to injuries. It’s crucial to listen to your body and allow adequate recovery time.
Shin Cuts and Bruises are a Sign of Effective Conditioning
- Myth: Visible damage, like cuts or bruises, indicates effective shin conditioning.
- Reality: Cuts and bruises are signs of trauma to the skin and underlying tissues. While minor bruises can occur, especially in the early stages of conditioning, consistent damage isn’t a sign of effective training and can lead to prolonged recovery times.
Is Shin Conditioning Permanent?
No, shin conditioning isn’t permanent.
Just as a bodybuilder needs to continue lifting weights to maintain muscle mass, someone who’s conditioned their shins needs to continue some form of shin conditioning to maintain the benefits.
To maintain optimal shin conditioning, training frequency can be reduced to once or twice per week compared to the initial conditioning phase of 3 or 4.
While there haven’t been any studies looking at how long it takes shin conditioning to decline, most fighters would likely lose optimal shin conditioning if they were to stop any training for a month.
If they stopped all shin conditioning for 3 or 4 months, their benefits would likely be gone and they’d have to go through another shin conditioning phase of 3 or 4 months to build them back up to optimal levels.
Here’s a breakdown of the impermanence of shin conditioning:
Bone Density
While the process of shin conditioning can increase bone density, this adaptation can diminish over time if not maintained.
Bones are living tissues that constantly undergo remodeling. Without regular stress or impact, the bones may lose some of their acquired density.
Muscle Hypertrophy
The muscles surrounding the shin, such as the tibialis anterior, can become stronger and more developed with conditioning. However, without regular exercise and training, muscles can atrophy or decrease in size and strength.
Pain Tolerance
The increased pain threshold achieved through shin conditioning can diminish if one stops training. The body and mind adapt to the stimuli they’re exposed to.
If the impact on the shins is removed, the body may revert to a lower pain tolerance over time.
Skin and Tissue Toughness
The skin and underlying tissues of the shin can become tougher with conditioning. However, without regular impact, they may lose some of this toughness and become softer and more susceptible to injury.
Overall
While the benefits of shin conditioning aren’t permanent, there are potentially permanent side effects readers should know about.
Shin Conditioning Side Effects: Are There Any?
Yes, shin conditioning comes with potential side effects. Here are 7 of the main side effects and considerations associated with shin conditioning:
1. Microfractures
As mentioned earlier, one of the processes of shin conditioning involves the formation of microfractures in the shin bone. While these tiny fractures are part of the natural adaptation process and usually heal stronger, there’s a risk.
If the training intensity is too high or if there’s inadequate recovery time, these microfractures can accumulate and lead to more significant injuries such as a transverse fracture of the tibia.
2. Bruising, Swelling, and Scarring
Especially in the initial stages of shin conditioning, practitioners can expect some bruising and swelling.
This is a natural response to trauma, but excessive bruising or prolonged swelling might indicate a more severe injury.
Also, after years of shin conditioning, scarring can form. This isn’t the most pleasant thing to look at and is something most fighters put up with.
3. Infection
Open cuts or abrasions on the shin, which can sometimes occur due to repeated impact, pose a risk of infection if not properly cleaned and cared for.
4. Chronic Pain
Over time, repeated trauma without adequate recovery can lead to chronic pain in the shins. This might be indicative of underlying damage or injury such as soft tissue or nerve damage.
5. Over-conditioning
There’s a balance to be struck between conditioning and over-conditioning. Overdoing it can lead to chronic issues and might decrease the shin’s ability to absorb impact effectively.
6. Arthritis
While there’s no direct evidence linking shin conditioning to arthritis, repeated trauma to any joint or bone can potentially increase the risk of developing arthritis in the long run. This is a risk all fighters take.
Proper technique, gradual progression, and adequate recovery are crucial to minimize these risks.
The Bottom Line
So, ‘What is shin conditioning?’
Shin conditioning is strengthening and toughening the shin bones and surrounding tissues through systematic and controlled exposure to impact and stress – making the shins more resilient to pain and injury during fights.
The science behind shin conditioning involves several components, including Wolff’s Law, microfractures, inflammatory response, ossification, collagen remodeling, muscle hypertrophy, and pain tolerance adaptation.
Proper shin conditioning involves a combination of exercises, techniques, and biological adaptations.
The key things are heavy bag kicking 3 or 4 times per week, strengthening the muscles around the shin twice per week, and making sure to fully recover before the next shin conditioning session.
Lastly, while the benefits of shin conditioning are significant, they aren’t permanent. Regular maintenance is required to keep the shins conditioned, and discontinuing the practice can lead to a decline in the benefits.
It’s crucial to listen to one’s body and prioritize recovery to reap the full benefits and avoid the side effects of shin conditioning.